Pengamen Jempolan,, Sangat Menghibur

Entah mau jadi apa tuh pengamen,,,,,penyanyi/pelawak/poltikus/guru...?

20 Tutorial Manipulasi Foto

Ingin belajar memanipulasi foto menggunakan Photoshop?? Berbagai wallpaper kebanyakan dibuat menggunakan Photoshop dengan bebagai efek dan hasil memanipulasi berbagai foto..

OS Android 3 Pada Komputer

OS Android 3 (Honeycomb) pada komputer. Pelajari caranya..

“Anak Durhaka” Malinkundang

Ingin tau kisah “Anak Durhaka” Malinkundang?? hehehe.... silahkan baca kisah selengkapnya..

Operating System Android

Operating System Android??? Apa itu “Android” ??

Angry Birds

Begitu hebohnya permainan “Angry Birds”

Game Full HD di Handphone

Game Full HD sekarang ada di genggamanmu..

Pengunjung

English German Dutch Portuguese Italian Russian Greek Brazilian French Spanish Arabic Korean Japanese Chinese Indonesian

Selasa, 12 Juli 2011

Selamat Datang Google+

Google+ _ Sudahkah anda mendengar tentang Google+ atau Google Plus ? Jika belum, selamat datang di Google+, karena Google+ adalah sebagai salah satu alternatif pengganti Facebook, atau bahkan cikal bakal pengganti Facebook, Twitter, dan social network lainnya, dengan slogannya
“Cara berbagi seperti dalam hidup nyata, yang dirancang kembali untuk web.”

Dan yah, Google + merupakan hal yang sangat baru bagi pengguna jejaring sosial di Indonesia. Google plus, seperti gambar diatas, merupakan sebuah proyek percobaan Google yang bertujuan untuk ‘menghancurkan’ Facebook. Uniknya, dengan munculnya Google Plus, membuat pendiri Facebook tergoda mencoba fitur yang ditawarkan oleh Google+, dan bahkan si pendiri Facebook pun ikut memuji keunggulan Google Plus. Akan tetapi, karena Google plus masih dalam tahapan uji coba, maka hanya sebagian orang saja yang sudah bisa menggunakan Google Plus. Lalu apa saja kelebihan dari Google Plus, berikut adalah daftarnya :
1.    Circles : Fungsi ini bisa digunakan untuk memasukkan nama-nama teman ke dalam grup dan pengguna bisa berbagi konten dengan format berbeda di dalam lingkaran pertemanan ini.
2.    Hangouts : Ini adalah layanan conference lebih dari dua orang dengan video call.
3.    Huddle : Layanan ini menyediakan grup-grup di jejaring ini untuk mengirim pesan instan.
4. Sparks : Fitur ini menghubungkan individu dalam jaringan ini kepada orang-orang yang memiliki ketertarikan yang sama terhadap suatu hal.

Nah, jika kamu tertarik ingin menggunakan dan mendaftar di Google Plus, berikut adalah video sebagai bahan pertimbangan untuk menggunakan Google Plus.

Google+ (plus)

Google+ _ Hebat, baru sehari setelah publikasi Google Plus / G+ / Gplus, langsung dikunjungi lebih dari 500 juta orang, yang ingin menjadi pengguna Google+, sedangkan Google Plus mengkalim jika mereka telah memiliki 500 juta pengguna perdana. Ketidak siapan mereka itulah yang membuat layanan ini untuk sementara waktu tidak bisa digunakan, karena mereka sedang meningkatkan kapasitas. Pada artikel sebelumnya, yang berjudul “Google Plus, Selamat Datang Di Google+“, aku telah menulis apa saja kelebihan Google+, beserta video perkenalan dari Google Plus. Kamu bisa membacanya apabila ingin mengetahui lebih dalam.

Untuk menggunakan Google+ via Android, kamu bisa mengunjungi Aplikasi Android, pada artikelku sebelumnya, karena Google Plus juga sudah menyiapkan aplikasi khusus agar Google Plus bisa dijalankan di Android apapun. Google+ merupakan nama jejaring sosial baru buatan Google, seperti dikutip dari BBC, Social Network baru itu memungkinkan setiap individu untuk berbagi foto, pesan dan komentar, dan juga bisa mengintegrasikan peta beserta gambar ke dalam layanannya.

Dan bahkan para pengamat mengatakan bahwa, Google Plus bisa menjadi ‘Facebook Killer’, karena memilki segala hal yang tidak dimiliki oleh Facebook, dan social network lainnya. Gimana, tertarik menggunakan Google Plus ? untuk mengakses Google+ silahkan ketik www.plus.google.com
Atau jika anda beluma mempunyai account, silahkan hubungi kami via email atau chatting, tulis email google Anda (gmail), kami bisa membantu membuatkan account google+ Anda.

Sabtu, 09 Juli 2011

Mempertajam Detail Rambut Pada Photoshop

Pada tutorial ini kita akan belajar tentang pembuatan seleksi pada Photoshop dengan mengggunakan layer mask. Seleksi dengan tehnik ini cocok digunakan untuk menyeleksi bagian yang sifatnya halus seperti ujung rambut ataupun bulu. Seleksi ini dibuat dengan membuat sebuah gambar hitam-putih yang digunakan sebagai dasar dari pembuatan seleksi-nya.

Bukalah gambar yang akan dibuat seleksi-nya dengan Adobe Photoshop. Pada contoh berikut ini saya menggunakan sebuah gambar foto yang diupload di Flickr oleh Asianleggy, yang sangat disayangkan sekarang sudah tidak aktif lagi di Flickr. Gambar di bawah ini sudah kupotong sebagian dengan Crop tool agar lebih memfokuskan pada bagian rambut yang akan diseleksi.

Aktifkan palet Channels (Window > Channels). Pada palet ini, pilihlah sebuah channel yang kamu anggap paling kontras (biasanya Blue). Kemudian duplikat-lah channel yang paling kontras tersebut (dengan menariknya ke icon new channel di sebelah bawah dari palet channel).

Buatlah agar gambar yang hitam putih pada foto yang sedang kita edit pake Photoshop ini menjadi semakin pekat dan nampak perbedaan antara bagian hitam dan putihnya.

Untuk membuatnya benar-benar hitam putih yang pekat, gunakanlah Burn tool, dan/atau Dodge tool pada tool box-nya Photoshop.
1.    Saat menggunakan Burn tool, Pilihlah pada option bar, range = Shadow. Exposurenya jangan terlalu banyak, sekitar 10-20% aja. Gunakan tool ini untuk menghitamkan area gambar.
2.    Saat menggunakan Dodge toolPilihlah pada option bar, range = Highlite. Exposurenya juga jangan terlalu banyak, sekitar 10-20% aja. Gunakan tool ini untuk memutihkan area gambar.

Kedua tool ini digunakan karena mengingat sulitnya mengisikan warna pada tempat yang sangat kecil atau sempit. Bagian ujung dari rambut sangatlah kecil, utamakan untuk menghitamkan bagian itu terlebih dulu. Berganti-gantilah antara kedua tool tersebut hingga didapat bagian tepi dari gambar tersebut berwarna hitam dan putih.
  
Untuk mempertahankan bagian rambut yang agak transparan, maka gunakan adalah Burn tool terlebih dulu. Tool ini kupakai untuk menghitamkan lebih dulu dengan tujuan agar bagian rambut yang agak transparan tidak keburu tertutup oleh Dodge tool.
Setelah bagian-bagian tepi dari gambar sudah nampak kontras dan berwarna hitam dan putih, sekarang buatlah seluruh bagian dalam dari gambar benar benar berwarna hitam dan putih seperti contoh gambar dibawah ini. Untuk mengisikan warnanya, gunakanlah Brush
tool.

Saat menggunakan Brush tool, pastikan warna Foreground dan Background adalah hitam dan putih (ini bisa dilakukan dengan menekan tombol D pada keyboard. Jika perlu membalik warnanya, tekan huruf X di keyboard).

Langkah berikutnya, mengingat bahwa prinsip penggunaan mask adalah: Hitam berarti tidak menjadi seleksi, dan Putih menjadi seleksi. Maka gambar ini perlu kita balik warnanya. Lakukan ini dengan memilih menu Image > Adjustment > Invert. Hasilnya seperti gambar dibawah ini.

Setelah menjadi seperti gambar diatas, kliklah icon Load channel as selection, letaknya di bagian bawah kiri pada palet Channels. Kemudian aktifkan lagi channel RGB, dengan cara meng-klik channel RGB yang ada pada di urutan paling atas di palet channel.

Sekarang pindahlah ke palet Layer. Jika gambar ini merupakan layer background, maka klik dua kali pada nama layer-nya kemudian klik OK. Setelah ini, klik icon Add layer mask, letaknya di bagian bawah dari palet layer.

Untuk melihat hasilnya akurat atau tidak, buatlah sebuah layer baru yang diisi dengan warna abu-abu, layer ini kemudian diletakkan urutannya di bawah layer yang sudah kita kerjakan tadi.

Aiiiiih..ternyata ada bagian dari rambut yang nampak putih ditepinya. Ini karena pada bagian tersebut gambar rambut sudah bercampur dengan background yang warnanya agak putih juga. Untuk menghilangkan warna putih ini, pilihlah warna yang mirip dengan warna rambut model ini (gunakan saja Eyedropper tool), kemudian sapukan warna ini dengan Brush tool. Pada saat menyapukan warna ini, mode blending sapuan brush kuganti dengan Darken (pengaturan ini ada pada option bar).

Berikut ini adalah hasilnya yang sudah terpotong dengan seleksi dan kuhilangkan warna putih di tepi rambutnya tadi.

Gampang kan caranya, walaupun memang agak njlimet dan perlu ketelitian. Ayo segera buka program Photoshop kamu dan dicoba..

Android 3.1 Platform Highlights

Welcome to Android 3.1!
Android 3.1 is an incremental platform release that refines many of the features introduced in Android 3.0. It builds on the same tablet-optimized UI and features offered in Android 3.0 and adds several new capabilities for users and developers. This document provides an overview of the new features and technologies introduced in Android 3.1. For a more detailed look at new developer APIs, see the API Overview document.
For a high-level introduction to Android 3.0, please see the Android 3.0 Platform Highlights.

New User Features


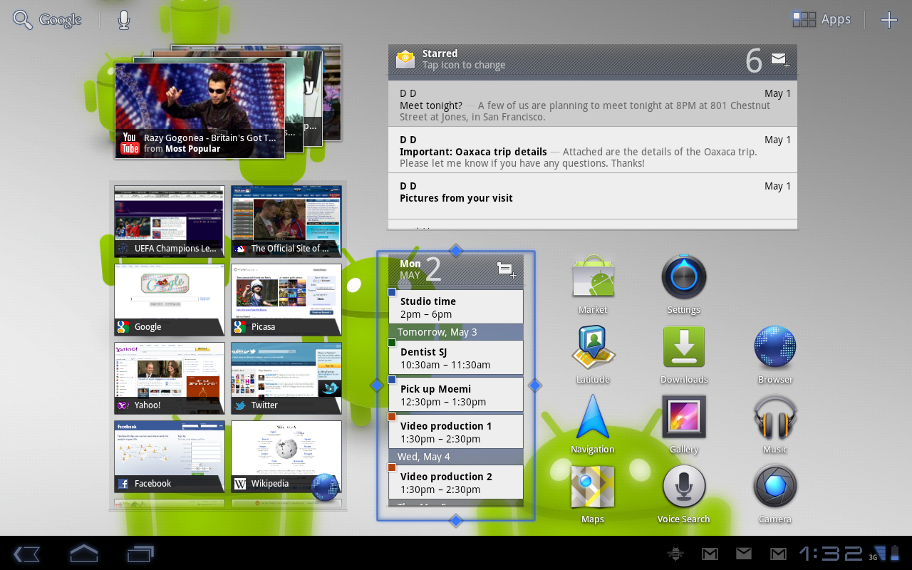
Figure 1. An Android 3.1 Home screen.

UI refinements

The Android 3.1 platform adds a variety of refinements to make the user interface more intuitive and more efficient to use.
UI transitions are improved throughout the system and across the standard apps. The Launcher animation is optimized for faster, smoother transition to and from the Apps list. Adjustments in color, positioning, and text make UI elements easier to see, understand, and use. Accessibility is improved with consistent audible feedback throughout the UI and a new setting to let users customize the touch-hold interval to meet their needs.
Navigation to and from the five home screens is now easier — touching the Home button in the system bar now takes you to the home screen most recently used. Settings offers an improved view of internal storage, showing the storage used by a larger set of file types.

Connectivity for USB accessories

Android 3.1 adds broad platform support for a variety of USB-connected peripherals and accessories. Users can attach many types of input devices (keyboards, mice, game controllers) and digital cameras. Applications can build on the platform’s USB support to extend connectivity to almost any type of USB device.
The platform also adds new support for USB accessories — external hardware devices designed to attach to Android-powered devices as USB hosts. When an accessory is attached, the framework will look for a corresponding application and offer to launch it for the user. The accessory can also present a URL to the user, for downloading an appropriate application if one is not already installed. Users can interact with the application to control powered accessories such as robotics controllers; docking stations; diagnostic and musical equipment; kiosks; card readers; and much more.
The platform’s USB capabilities rely on components in device hardware, so support for USB on specific devices may vary and is determined by device manufacturers.
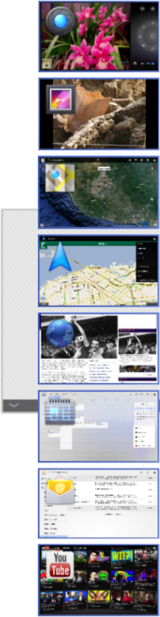
Figure 2. The Recent Apps menu is now expandable and scrollable.

Expanded Recent Apps list

For improved multitasking and instant visual access to a much larger number of apps, the Recent Apps list is now expandable. Users can now scroll the list of recent apps vertically to see thumbnail images all of the tasks in progress and recently used apps, then touch a thumbnail to jump back into that task.

Resizeable Home screen widgets

For more flexible Home screen customization, users can now resize their Home screen widgets using drag bars provided by the system. Users can expand widgets both horizontally and/or vertically to include more content, where supported by each widget.

Support for external keyboards and pointing devices

Users can now attach almost any type of external keyboard or mouse to their Android-powered devices, to create a familiar environment and work more efficiently. One or more input devices can be attached to the system simultaneously over USB and/or Bluetooth HID, in any combination. No special configuration or driver is needed, in most cases. When multiple devices are connected, users can conveniently manage the active keyboard and IME using the keyboard settings that are available from the System bar.
For pointing devices, the platform supports most types of mouse with a single button and optionally a scroll wheel, as well as similar devices such as trackballs. When these are connected, users can interact with the UI using point, select, drag, scroll, hover, and other standard actions.

Support for joysticks and gamepads

To make the platform even better for gaming, Android 3.1 adds support for most PC joysticks and gamepads that are connected over USB or Bluetooth HID.
For example, users can connect PlayStation®3 and Xbox 360® game controllers over USB (but not Bluetooth), Logitech Dual Action™ gamepads and flight sticks, or a car racing controller. Game controllers that use proprietary networking or pairing are not supported by default, but in general, the platform supports most PC-connectible joysticks and gamepads.

Robust Wi-Fi networking

Android 3.1 adds robust Wi-Fi features, to make sure that users and their apps can take full advantage of higher-speed Wi-Fi access at home, at work, and while away.
A new high-performance Wi-Fi lock lets applications maintain high-performance Wi-Fi connections even when the device screen is off. Users can take advantage of this to play continuous streamed music, video, and voice services for long periods, even when the device is otherwise idle and the screen is off.
Users can now configure an HTTP proxy for each individual Wi-Fi access point, by touch-hold of the access point in Settings. The browser uses the HTTP proxy when communicating with the network over the access point and other apps may also choose to do so. The platform also provides backup and restore of the user-defined IP and proxy settings.
The platform adds support for Preferred Network Offload (PNO), a background scanning capability that conserves battery power savings in cases where Wi-Fi needs to be available continuously for long periods of time.

Updated set of standard apps

The Android 3.1 platform includes an updated set of standard applications that are optimized for use on larger screen devices. The sections below highlight some of the new features.
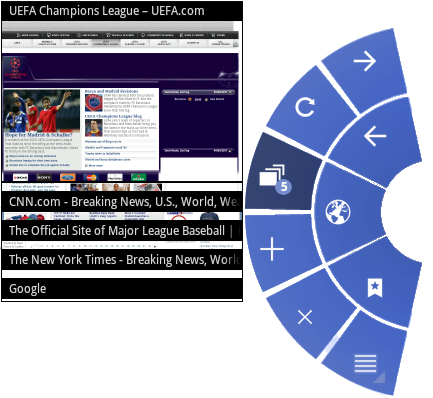
Figure 3. Quick Controls menu in the Browser.
Browser
The Browser app includes a variety of new features and UI improvements that make viewing web content simpler, faster, and more convenient.
The Quick Controls UI, accessible from Browser Settings, is extended and redesigned. Users can now use the controls to view thumbnails of open tabs and close the active tab, as well as access the overflow menu for instant access to Settings and other controls.
To ensure a consistent viewing experience, the Browser extends it's support for popular web standards such as CSS 3D, animations, and CSS fixed positioning to all sites, mobile or desktop. It also adds support for embedded playback of HTML5 video content. To make it easier to manage favorite content, users can now save a web page locally for offline viewing, including all styling and images. For convenience when visiting Google sites, an improved auto-login UI lets users sign in quickly and manage access when multiple users are sharing a device.
For best performance, the Browser adds support for plugins that use hardware accelerated rendering. Page zoom performance is also dramatically improved, making it faster to navigate and view web pages.
Gallery
The Gallery app now supports Picture Transfer Protocol (PTP), so that users can connect their cameras over USB and import their pictures to Gallery with a single touch. The app also copies the pictures to local storage and provides an indicator to let users see how much space is available.
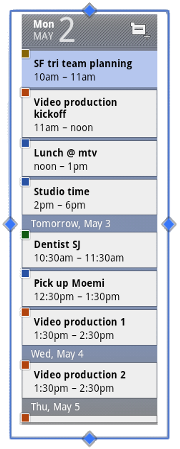
Figure 4. Home screen widgets can now be resized.
Calendar
Calendar grids are larger, for better readability and more accurate touch-targeting. Additionally, users can create a larger viewing area for grids by hiding the calendar list controls. Controls in the date picker are redesigned, making them easier to see and use.
Contacts
The Contacts app now lets you locate contacts more easily using full text search. Search returns matching results from all fields that are stored for a contact.
Email
When replying or forwarding an HTML message, The Email app now sends both plain text and HTML bodies as a multi-part mime message. This ensures that the message will be formatted properly for all recipients. Folder prefixes for IMAP accounts are now easier to define and manage. To conserve battery power and minimize cell data usage, the application now prefetches email from the server only when the device is connected to a Wi-Fi access point.
An updated Home screen widget give users quick access to more email. Users can touch Email icon at the top of the widget to cycle through labels such as Inbox, Unread, and Starred. The widget itself is now resizable, both horizontally and vertically.

Enterprise support

Users can now configure an HTTP proxy for each connected Wi-Fi access point. This lets administrators work with users to set a proxy hostname, port, and any bypass subdomains. This proxy configuration is automatically used by the Browser when the Wi-Fi access point is connected, and may optionally be used by other apps. The proxy and IP configuration is now backed up and restored across system updates and resets.
To meet the needs of tablet users, the platform now allows a "encrypted storage card" device policy to be accepted on devices with emulated storage cards and encrypted primary storage.

New Developer Features

The Android 3.1 platform adds refinements and new capabilities that developers can build on, to create powerful and engaging application experiences on tablets and other large-screen devices.

Open Accessory API for rich interaction with peripherals

Android 3.1 introduces a new API for integrating hardware accessories with applications running on the platform. The API provides a way to interact across a wide range of peripherals, from robotics controllers to musical equipment, exercise bicycles, and more.
The API is based on a new USB (Universal Serial Bus) stack and services that are built into the platform. The platform provides services for discovering and identifying connected hardware, as well as for notifying interested applications that the hardware is available.
When a user plugs in a USB accessory, the platform receives identifying information such as product name, accessory type, manufacturer, and version. The platform sets up communication with the accessory and uses its information to notify and launch a targeted app, if one is available. Optionally, an accessory can provide a URL that lets users find and download an app that works with the accessory. These discovery features make first-time setup easier for the user and ensure that an appropriate application is available for interacting with the connected hardware.
For application developers and accessory manufacturers, accessory mode offers many new ways to engage users and build powerful interaction experiences with connected hardware.
To learn more about how to develop applications that interact with accessories, see the USB Accessory documentation.

USB host API

Android 3.1 provides built-in platform support for USB host mode and exposes an API that lets applications manage connected peripherals. On devices that support host mode, applications can use the API to identify and communicate with connected devices such as audio devices. input devices, communications devices, hubs, cameras, and more.
To learn more about how to develop applications that interact with USB devices, see the USB Host documentation.

Input from mice, joysticks, and gamepads

Android 3.1 extends the input event system to support a variety of new input sources and motion events, across all views and windows. Developers can build on these capabilities to let users interact with their applications using mice, trackballs, joysticks, gamepads, and other devices, in addition to keyboards and touchscreens.
For mouse and trackball input, the platform supports two new motion event actions: scroll (horizontal or vertical) such as from a scrollwheel; and hover, which reports the location of the mouse when no buttons are pressed. Applications can handle these events in any way needed.
For joysticks and gamepads, the platform provides a large number of motion axes that applications can use from a given input source, such as X, Y, Hat X, Hat Y, rotation, throttle, pressure, size, touch, tool, orientation, and others. Developers can also define custom axes if needed, to capture motion in additional ways. The platform provides motion events to applications as a batch, and applications can query the details of the movements included in the batch, for more efficient and precise handling of events.
Applications can query for the list of connected input devices and the motion ranges (axes) supported by each device. Applications can also handle multiple input and motion events from a single input device. For example, an application can use mouse and joystick and mouse event sources from a single input device.

Resizable Home screen widgets

Developers can now create Home screen widgets that users can resize horizontally, vertically, or both. By simply adding an attribute to the declaration of a widget, the widget becomes resizable horizontally, vertically, or both. This lets users customize the display of the widget content and display more of it on their Home screens.

MTP API for integrating with external cameras

In Android 3.1, a new MTP (Media Transfer Protocol) API lets developers write apps that interact directly with connected cameras and other PTP devices. The new API makes it easy for applications to receive notifications when devices are attached and removed, manage files and storage on those devices, and transfer files and metadata to and from them. The MTP API implements the PTP (Picture Transfer Protocol) subset of the MTP specification.

RTP API, for control over audio streaming sessions

Android 3.1 exposes an API to its built-in RTP (Real-time Transport Protocol) stack, which applications can use to directly manage on-demand or interactive data streaming. In particular, apps that provide VOIP, push-to-talk, conferencing, and audio streaming can use the API to initiate sessions and transmit or receive data streams over any available network.

Performance optimizations

Android 3.1 includes a variety of performance optimizations that help make applications faster and more responsive. Some of the optimizations include:
  • A new LRU cache class lets applications benefit from efficient caching. Applications can use the class to reduce the time spent computing or downloading data from the network, while maintaining a sensible memory footprint for the cached data.
  • The UI framework now supports partial invalidates in hardware-accelerated Views, which makes drawing operations in those Views more efficient.
  • A new graphics method, setHasAlpha(), allows apps to hint that a given bitmap is opaque. This provides an extra performance boost for some types of blits and is especially useful for applications that use ARGB_8888 bitmaps.

Jumat, 01 Juli 2011

20 Tutorial Manipulasi Foto di Photoshop

Lagi jalan-jalan googling, saya dapat inspirasi dan menurut saya ini patut dan perlu untuk dishare kepada temen-temen pecinta Photoshop.Sebelumnya kalo tutorial dirasa kurang, saya masih punya banyak,,,hehe silahkan ke Tutorial Manipulasi Foto. ya udah tanpa banyak bicara, langsung menuju TKP... (asli nya juga males banyak bicara, hehehe..)

Best of Photoshop Tutorials 2009 
Dalam tutorial ini akan ditunjukkan beberapa teknik untuk memberikan efek fluida cair atau beku hampir bagi semua objek di dalam foto. Hal ini juga akan mengungkapkan cara termudah untuk mengekstrak gambar cair dan menjaga tetap transparan.

 Best of Photoshop Tutorials 2009
Dalam tutorial ini, akan diajarkan cara membuat wallpaper gadis sangat senang yang menikmati kehidupan. Tutorial ini untuk Photoshop, tetapi beberapa langkah kecil ada yang harus dilakukan di adobe illustrator.

 Best of Photoshop Tutorials 2009
Ini adalah tutorial yang menggambarkan teknik perspektif dan bagaimana anda dapat mencapai rasa yang mendalam dalambergerak. Anda melakukan ini dalam beberapa langkah, seperti menempatkan karakter utama, menciptakan volume memudar dan menambahkan latar depan dan gambar latar belakang.

 Best of Photoshop Tutorials 2009
Dalam tutorial ini mereka akan membawa Anda melalui proses kreatif untuk membuat efek cahaya yang menarik dan menerapkannya dalam proyek photoshop anda. Ini lebih merupakan gambaran proses pembuatan ilustrasi dari langkah demi langkah bagaimana. Ini memberi Anda beberapa bimbingan yang baik tentang bagaimana untuk menangani dengan ilustrasi seperti ini dan menutupi alur kerja secara keseluruhan.

 Best of Photoshop Tutorials 2009
Pelajari cara untuk menciptakan manipulasi pohon fantastis dengan beberapa gambar saham dan tekstur.

 Best of Photoshop Tutorials 2009
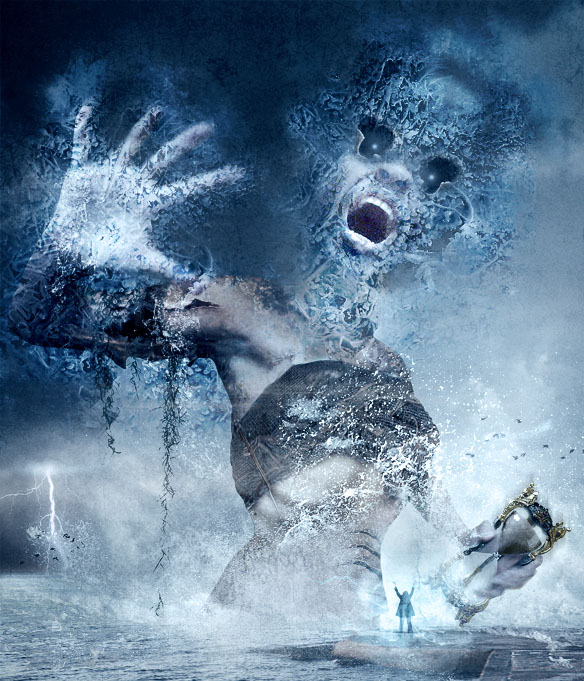
Dalam tutorial ini anda akan belajar bagaimana membuat manipulasi foto fantasi disebut “You Can Not Frost The Time”, menggunakan beberapa alat bantu Photoshop seperti Rentang Warna, mode blending berbeda, dan yang lainnya.
;">

 Best of Photoshop Tutorials 2009
Dalam tutorial ini anda akan belajar bagaimana memanipulasi gambar api dan asap untuk menciptakan efek, ledakan intens bersinar dan membias berbentuk wajah.

 Best of Photoshop Tutorials 2009
Dari tembakan mode untuk potret, berikut adalah cara untuk menambahkan sentuhan ajaib dengan efek pencahayaan. Mengubah foto run-of-the-mill menjadi satu yang mempesona dan sederhana - ketika Anda tahu trik yang tepat. Dalam tutorial ini, maestro Photoshop Aeiko menunjukkan bagaimana untuk membuat berbagai efek cahaya yang dapat diterapkan pada fotografi atau ilustrasi dengan dampak yang sama.

 Best of Photoshop Tutorials 2009
Dalam tutorial ini, anda akan ditunjukkan bagaimana membuat manipulasi foto tampak futuristik menggunakan beberapa alat khusus, seperti Eraser Tool Background dan bagaimana campuran gambar yang benar menggunakan Penyesuaian Warna Match dan Lighting Effect.

 Best of Photoshop Tutorials 2009
Pelajari cara menerapkan Warp Tool efektif dan beberapa trik lain untuk membuat asap tampak seperti tengkorak. Teknik ini memiliki berbagai hasil dan bekerja dengan baik dengan air, awan dan lain-lain.

 Best of Photoshop Tutorials 2009

 Best of Photoshop Tutorials 2009
Dalam tutorial ini, Anda akan mengubah sinar matahari penuh, foto biasa menjadi gambar suram dunia setelah kehancuran umat manusia. Menggunakan alat sederhana, Anda akan mengubah jalan hidup menjadi puing-puing yang ditinggalkan ditumbuhi gulma. Sejumlah gambar saham dan beberapa trik-trik kecil akan membiarkan Anda mengoptimalkan pekerjaan Anda dan membuat pekerjaan ini lebih menarik dan spektakuler.

 Best of Photoshop Tutorials 2009
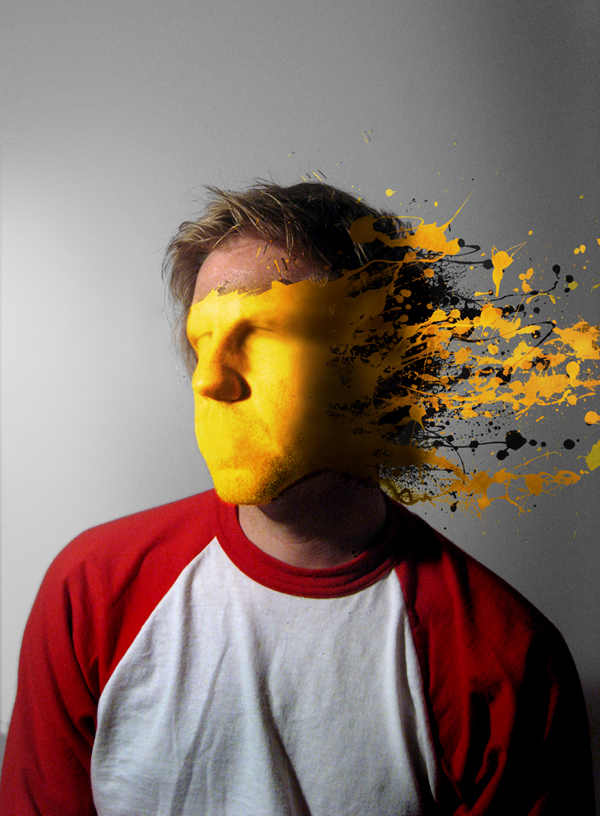
Dalam tutorial ini, Anda akan belajar bagaimana untuk mengambil cat cipratan kuas Photoshop dan menerapkannya pada kontur wajah model. Ini adalah teknik yang relatif sederhana, yang menghasilkan hasil seni yang sangat baik.

 Best of Photoshop Tutorials 2009
Dalam tutorial ini, Anda akan pergi melalui semua langkah untuk menciptakan tengkorak terbakar di Photoshop. Anda akan menggunakan beberapa gambar api, dan vektor tengkorak saham Designious untuk Anda memulai. Tutorial ini mencakup beberapa langkah yang relatif sederhana dan beberapa teknik manipulasi foto yang pintar.

 Best of Photoshop Tutorials 2009
Sesekali Anda mungkin menemukan diri Anda perlu untuk memasukkan gambar subjek menjadi latar belakang di mana pencahayaan antara dua objek tidak cocok. Gambar subjek Anda mungkin datar menyala, sementara latar belakang Anda berisi bayangan yang tajam dan highlight, dan jika Anda tidak memperbaiki masalah Anda menjalankan risiko mendapatkan beban komentar kritis. Yang paling bijaksana untuk dilakukan adalah tetap berburu untuk sumber gambar mana pencahayaan tidak cocok. Tapi kadang-kadang Anda dapat secara efektif memperbaiki masalah pencahayaan dan contoh bagaimana ini dapat dilihat pada gambar gajah raksasa yang sedang berjalan disebuah jalan di kota.
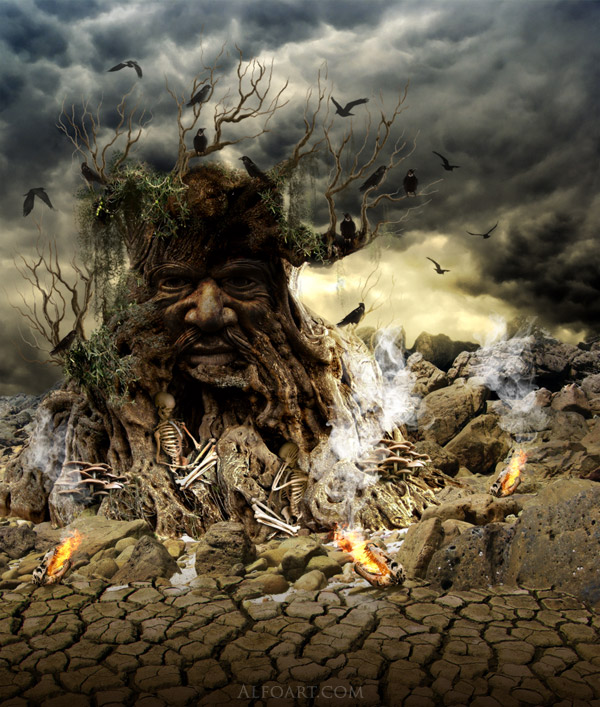
 Best of Photoshop Tutorials 2009
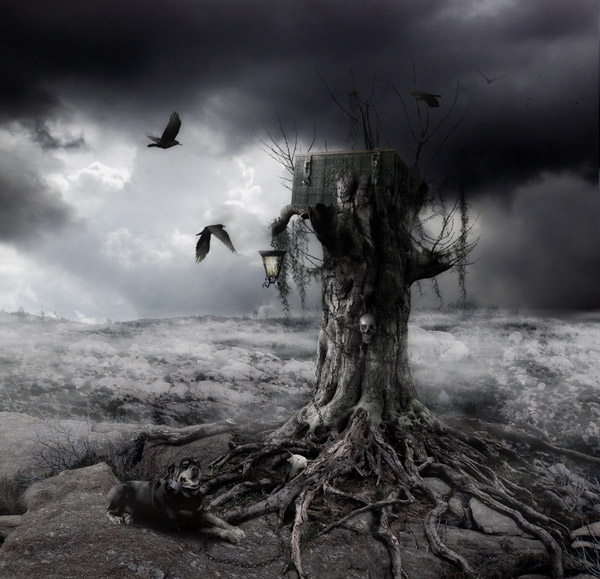
Anda akan belajar bagaimana untuk menciptakan lanskap yang horor, menyeramkan dan misterius, menggunakan stok gambar, tekstur dan beberapa efek kreatif.

 Best of Photoshop Tutorials 2009
Dalam tutorial ini, Anda akan belajar bagaimana menggunakan berbagai warna, pencahayaan, memotong dan menyisipkan teknik untuk membuat manipulasi foto surealis.

 Best of Photoshop Tutorials 2009
Dalam tutorial ini Anda akan menggunakan kuas untuk menciptakan apa yang terlihat seperti noda cat, tetapi dalam pekerjaan anda yang akan datang, anda dapat menggunakan teknik yang mirip dengan sejumlah bentuk gaya untuk membedah dan mendistorsi subjek Anda.

 Best of Photoshop Tutorials 2009
Dalam tutorial ini Anda akan membuat manipulasi foto terinspirasi oleh Valhalla, salah satu karya Mariusz Karasiewicz`s. Dia adalah seorang seniman yang luar biasa dan karyanya benar-benar menakjubkan.

 Best of Photoshop Tutorials 2009
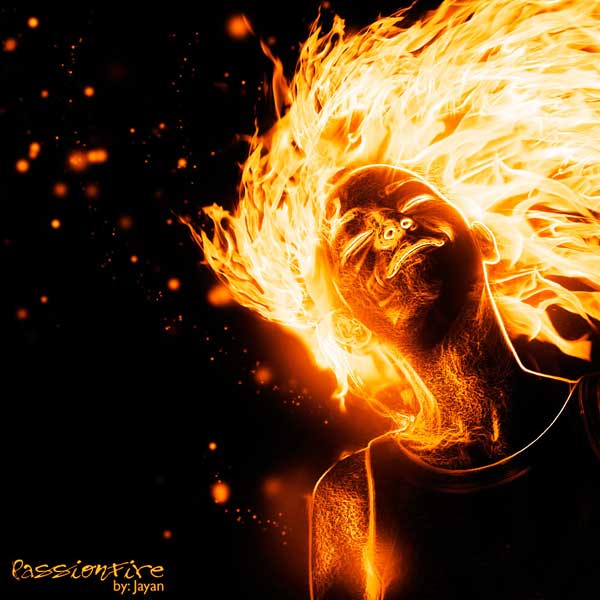
Dalam tutorial ini, Anda akan memanipulasi gambar sehingga terlihat seperti wanita terbakar di api. Gagasan di balik manipulasi ini adalah untuk menciptakan ilustrasi nice looking, hanya dengan menggunakan teknik sederhana dan alat-alat seperti Brush tool dan perintah Warp.

Seluruh Contoh Hasil Pekerjaan Tutorial Di Atas Bisa Dilhat Di Bawah Ini


Comments Facebook

Camera DSLR Simulator

Twitter Delicious Facebook Digg Stumbleupon Favorites More